![[ Element K Journals ]](/graphics/zdjlogo.gif)
|
|
![[ Inside Solaris ]](/forms/graphics/sun-form.gif) |
|
About our Experts • Email the Editor • Inside Solaris Tips Subscribe |
![[ Product! ]](/graphics/ads/spot-mad.gif) Get your FREE issue of Mac Administration today! |
|
February 1996
Solstice DiskSuite 4.0 for Solaris
When you're administering large Solaris systems with multiple hard disks, it's important to remember that to increase data integrity and decrease system down time, you should consider a mirroring configuration for your hard disks. Under normal circumstances, you'd have to look at several disk administration packages to accomplish this task. With the release of Solstice DiskSuite 4.0 for Solaris, SunSoft has provided the ultimate filesystem management tool.With the DiskSuite 4.0 package, you'll get better performance, greater capacity, easier administration, and improved availability of disk storage on your SPARC or x86 systems. In this article, we'll take a look at the features of DiskSuite 4.0 and show you how to use them to improve your disk storage management.
Getting started
DiskSuite 4.0 supports both SPARC and x86 systems running Solaris 2.4 or higher. On these platforms, DiskSuite 4.0 supports the following hard drive types:
- IPI disk drives
- SCSI disk drives
- IDE disk drives (x86 only)
The main utility for DiskSuite 4.0 is the DiskSuite Tool Metadevice Editor. In order for this utility to run, you must also install the Motif run-time package SUNWmfrun included with the DiskSuite software. To install DiskSuite 4.0, use the swmtool or pkgadd utility.
DiskSuite 4.0 features
DiskSuite 4.0 provides several features with an easy-to-use interface. The first feature, mirroring, provides faster data availability and greater reliability with up to three-way mirroring supported.Mirroring a filesystem replicates all write operations from a single local device to multiple devices, or sub-mirrors, while distributing read operations. This provides greater data reliability by creating duplicate copies of write operations. It also improves your system performance by distributing read operations to your local filesystem and its sub-mirrors.
With DiskSuite 4.0, you can mirror any filesystem on your equipment, including the root and swap filesystems. The mirroring feature also includes optimized resyncing, which reduces the time required for synchronization by updating only the regions not in sync (identical) when the system reboots.
The UNIX filesystem (UFS) logging facility, another feature of DiskSuite 4.0, records filesystem updates in a log before applying them to your filesystem. This provides for faster local directory operations, speeds up reboots, and decreases synchronous disk writes.
To prevent crashes and loss of data, you can configure mirrored devices as hot spare facilities to take over when a component fails. This hot spare facility function also works with another DiskSuite supported feature, RAID level 5 configurations.
You can create RAID level 5 configurations with DiskSuite 4.0. RAID, or Redundant Arrays of Inexpensive Disks, enables greater fault tolerance than disk mirroring by providing multiple disk sets as redundant drives. This is especially convenient when used with hot spare facilities for removing and replacing failed components.
Another feature that improves disk performance with DiskSuite 4.0 is disk striping. Striping enables you to spread data requests over multiple components of your mirror or RAID configuration. DiskSuite 4.0 also supports concatenation as a method for mapping sequential blocks on a physical partition to a logical device.
DiskSuite 4.0 databases
Before using DiskSuite, you must create the metadevice state database with at least at least three copies of the database. The metadevice state database contains information about your metadevice configuration in much the same way that NIS+ contains system information about your network. The metadevice state database is therefore essential for using DiskSuite 4.0. Let's take a look at how you create the database and its replicas.If you're installing Solaris with DiskSuite 4.0, create a partition for your database replicas during the installation procedure. If your installation has unused partitions, you can use them as components of your metadevices. If you've already installed Solaris and have allocated your hard disk space accordingly, you'll need to allocate space from another partition.
Since many of you will be faced with this situation, we'll demonstrate the technique by borrowing space from our swap partition. Re-allocating space from a partition other than /swap will cause a loss of data. If you don't have a swap partition, you may want to consider backing up and reinstalling your operating system to accommodate a partition for your metadevice state database.
To borrow space from /swap, you'll need to bring your system down to single-user mode. Once in single-user mode, turn off swapping to the partition you intend to borrow. Enter the command
swap -lYou should see something similar to this:
swapfile
dev
swaplo
blocks
free
/dev/dsk/c0t3d0s1
32,25
8
132040
132040
To disable swapping to the partition, enter the command
swap -d /dev/dsk/c0t3d0s1Once you've done this, you're ready to re-allocate the partition by editing the disk label with the format command.
At the prompt, enter the command
format
and select the appropriate disk number to edit. If you have only one hard disk in your system, enter 0 to load the Format menu. At the bottom of the Format menu, enter the command
format>partitionat the prompt. This will bring you to the partition> prompt. At the prompt, enter the command
partition>printto view the partition table for your hard disk. Once you've displayed the partition table, enter the partition number in the far left column on your screen assigned to swap. To demonstrate, we'll use the partition table shown in Table A.
Table A: Unless you specify otherwise, the swap partition is usually partition number 1 on Solaris systems.
| Part | Tag | Flag | Cylinders | Size | Blocks |
| 0 | root | wm | 0 - 507 | 250.03MB | (508/0/0) 512064 |
| 1 | swap | wu | 508 - 638 | 64.48MB | (131/0/0) 132048 |
| 2 | backup | wm | 0 - 2035 | 1002.09MB | (2036/0/0) 2052288 |
| 3 | usr | wm | 639 - 890 | 124.03MB | (254/0/0) 254016 |
| 4 | unassigned | wm | 0 | 0 | (0/0/0) 0 |
| 5 | unassigned | wm | 891 - 1198 | 151.59MB | (308/0/0) 310464 |
| 6 | usr | wm | 1199 - 1422 | 110.25MB | (224/0/0) 225792 |
| 7 | home | wm | 1423 - 2032 | 300.23MB | (610/0/0) 614880 |
At the partition> prompt enter 1 for the swap partition, and you'll be shown four prompts. You can answer the first three prompts
Enter partition id tag [swap]:
Enter partition permission flags [wu]:
Enter new starting cyl [508]:
by simply pressing [Enter] after each one. For the fourth prompt
Enter partition size [132048b, 131c, 64.48mb]:you'll need to enter the new size of the par-tition. Since you'll be borrowing from this partition to create a new one for your meta-device state database, you'll use half of the partition, or 65c. Once you enter this number, you'll return to the partition> prompt.
After you change your swap partition size, you'll need to allocate the now-unused disk space to a partition. In Table A, you can see that partition 4 is unassigned and has a size of 0. To view your current partition table, enter the command print at the prompt. Notice that the swap partition now ends on cylinder 573. This will be important when you assign the disk space to the new partition.
Enter 4 at the partition>prompt and answer the next two prompts by pressing [Enter]. The third prompt requires you to enter the new starting cylinder for the partition. Since your new swap ends on 573, the starting cylinder will be 574 for this partition. Enter this number and press [Enter].
The fourth prompt asks for the partition size. Enter the same number as you did for the new swap partition size, 65c. When you finish, enter the command print to view your changes to your partition table. They should appear as shown in Table B.
Table B: Once you make your partition table changes, you can view them before making them permanent.
| Part | Tag | Flag | Cylinders | Size | Blocks |
| 0 | root | wm | 0 - 507 | 250.03MB | (508/0/0) 512064 |
| 1 | swap | wu | 508 - 573 | 32.48MB | (66/0/0) 66528 |
| 2 | backup | wm | 0 - 2035 | 1002.09MB | (2036/0/0) 2052288 |
| 3 | usr | wm | 639 - 890 | 124.03MB | (254/0/0) 254016 |
| 4 | unassigned | wm | 574 - 638 | 31.99MB | (65/0/0) 65520 |
| 5 | unassigned | wm | 891 - 1198 | 151.59MB | (308/0/0) 310464 |
| 6 | usr | wm | 1199 - 1422 | 110.25MB | (224/0/0) 225792 |
| 7 | home | wm | 1423 - 2032 | 300.23MB | (610/0/0) 614880 |
Now that you've made your changes to you partition table and double-checked your filesystem sizes, you can write the partition table with the command
partition> labelYou'll then be prompted to confirm the labeling procedure. Answer yes and you'll return to the prompt. Simply enter quit at the partition> and format> prompts to return to your command prompt. Reboot the system for the changes to take effect.
Creating metadevice state database replicas
Once you've created the partition for your metadevice state database, you can create the replicas for the database and begin your DiskSuite 4.0 configuration. To create three replicas on our demonstration filesystem, we'll enter the command
metadb -c 3 -a -f /dev/dsk/c0t3d0s4Make sure that the directory
/usr/opt/SUNWmd/sbinis included in your path in order to execute the command. Since this is the first time you've used the command metadb, you'll see the error message
metadb: There are no existing databasesYou can ignore this message. Now that you've created the database replicas, you can run the DiskSuite Tool to configure your system storage.
In our demonstration, we've created the metadevice state database replicas on the same partition as well as on the same controller. For obvious reasons, this is definitely NOT the best possible configuration. If the hard disk controller fails or if the partition is corrupted, the purpose for using DiskSuite, the integrity of your data, would be defeated. When configuring DiskSuite 4.0 on your system, try to create database replicas on separate partitions and on separate controllers whenever possible for the greatest possiblereliability.
DiskSuite Tool
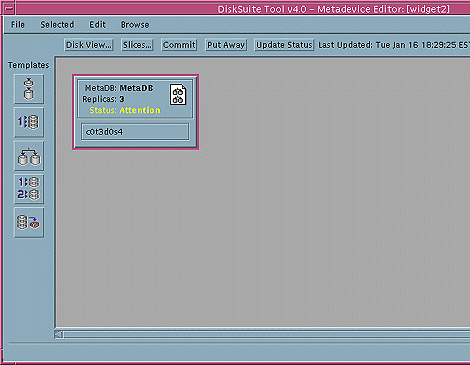
Now that your metadevice state database exists, you can begin configuring your disk storage with the DiskSuite Tool. To launch the utility, use the command/usr/opt/SUNWmd/sbin/metatoolWhen invoked, the metatool command opens the DiskSuite Tool Metadevice Editor window, shown in Figure A.
Figure A: The Metadevice Editor window allows you to configure your disk storage with
an easy-to-use interface.
The Metadevice Editor window contains three main areas. The largest area in the center of the window is called the canvas. You can move and manipulate graphical objects representing your metadevices in the canvas window. The device list window, shown in the upper-right portion of the main window in the Metadevice Editor, displays the available disk devices. These devices can include your metadevices, hot spare pools when configured, and problem areas as well.
In the lower-right portion of the Metadevice Editor window, you'll see the panner as a black box. When you manipulate all of your devices at once in the canvas window, the panner lets you move your view of the canvas window by dragging the window outline in the panner box. This way, you can bypass using the scroll bars on the bottom and right side of the canvas window.
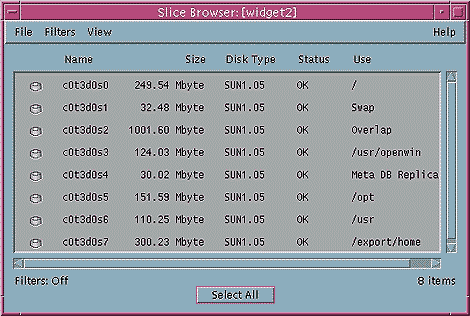
The templates, listed on the left side of the canvas window, are ready-made graphical devices you can drag and drop onto the canvas. Once you open a template, you can then select from your partitions with the Slice Browser, shown in Figure B. To open the Slice Browser, press the Slices... button above the canvas window. From the Slice Browser, you can drag and drop a slice onto a metadevice template. In this way, you can create mirrors, RAID services, and hot spare facilities.
Figure B: The Slice Browser displays your disk partition table with drag-and-drop
graphical representations of your partitions.
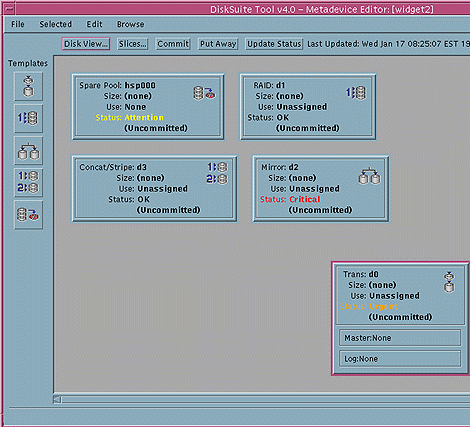
As you create devices by opening templates, you'll notice that any problem with a given device is immediately noted in the Status: field, as shown in Figure C. This gives you instant information on a problem with any device. You can then open the problem log from the Browse menu at the top of the Metadevice Editor to view a description of a problem with a metadevice.
Figure C: The graphical devices in the canvas window display any problems immediately in the Status: field.
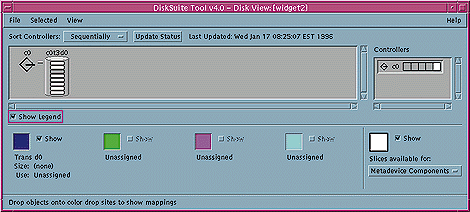
Another administrative device for viewing all of your physical devices configured and their logical counterparts is the Disk View window. To open this window, press the Disk View... button above the canvas window. In this window, you can view all of the attached physical drives and the metadevices associated with them. In Figure D, you can see that our system has only one physical drive device. On larger systems, you can view local and remotely configured drives in the Disk View window.
Figure D: The Disk View window displays your physical devices and their logical
counterparts.
The main area of the Disk View window is called the canvas just like the main window of the Metadevice Editor. The Controllers list on the right side of the Disk View window displays all controllers locally and remotely attached. From this window, you can drag and drop partition slices for mirroring other systems on your network.
Conclusion
When you manage large systems, ensuring data integrity is a major part of system administration. Solstice DiskSuite 4.0 enables you to improve data integrity through data mirroring and RAID level 5 implementation as well as providing configurable hot spare facilities to ensure against component failure. In addition, DiskSuite 4.0 provides these services with an easy-to-use graphical user interface. In this article, we've taken a look at DiskSuite 4.0 for Solaris and shown you some of its features for providing data integrity as well as ease of use.
» Get a PREVIEW ISSUE of Inside Solaris
» Read other Inside Solaris articles
» Read related Element K Journals articles
- "Understanding RAID technology" Exploring Windows NT, June 1995
» Read related articles on ZDNet
- "All the Shades of RAID" Computer Shopper Magazine, August 1998
|
|
Copyright © 2001 Element K Content LLC. All rights reserved. Reproduction in whole or in part in any form or medium without express written permission of Element K Content LLC is prohibited. Element K is a service mark of Element K LLC.
![[ Advertise with Us! ]](/graphics/ads/adwithus.gif) Privacy Policy
Questions? Comments?
Privacy Policy
Questions? Comments?

